Showing posts with label chainguard. Show all posts
Wednesday, June 1, 2011
SoWa Bike
This bike was getting a lot of attention at the SoWa Open Market (Sundays in the South End). There was an Italian family touching it, I got to feeling a little bit uncomfortable with their enthusiastic appreciation - it seems that bike groping etiquette is different across cultures. Would you touch another person's bike? Most particularly, would you explore the firmness of their Brooks saddle?
Thursday, March 3, 2011
Wednesday, September 22, 2010
Sunflowers
Monday, July 26, 2010
Relaxed and Elegant
Monday, July 5, 2010
Wisteria Lane
I can report with authority that the Wisteria Lane bicycle now has a white flower garland. It looks fresh and lovely.
Wednesday, May 5, 2010
Donut Stop?

It seems that I am endlessly amused by the sight of a bike in front of Dunkin' Donuts. But you'll agree, this blue beauty looks good there. I've seen her elsewhere in Cambridge, such a pretty bike gets noticed.
Wednesday, March 31, 2010
Handsome Cyclist MGH
I'm happy to be feeling better and ready to start blogging again. I missed you guys.
I have for you here a handsome gentleman spotted near MGH. I got several photos of him but it was difficult to capture the gleam of his bike. Despite the muck everywhere his bike was obviously well cared for. It looks like a perfect city bike - fenders, rack, basket, chainguard, and a sprung Brooks saddle. Beautiful.
Happy start of street cleaning day!
Tuesday, January 19, 2010
Pretty Blue Fleet Wing
Monday, December 28, 2009
Monday, November 30, 2009
Monday, November 23, 2009
Getting There!

What a treat to look back at my post from March 4, 2008. As of this weekend I have accomplished all the goals listed there and more.
On the list for upgrading I had:- a front rack
- a wine box from a good vineyard for carrying groceries (we'll have to buy the wine too, this is an expensive upgrade)
- better tires
- chainguard
- maybe go singlespeed
Well, as to this last goal, I decided that an internal hub might be better for my needs while still accomplishing the winter protection I was looking for. My husband built the wheel and we got it installed yesterday. The only challenge was that my handlebars are not round, and not standard, so getting the shifter on was a big deal. Everything else went smoothly. I chose a new Sturmey-Archer three speed mostly because it was already sized for my very narrow dropouts and I didn't want to have to spread the rear triangle. We laced it to a Salsa Delgado rim. My only complaint thus far is that I didn't realize the hub would click whether I was pedaling or coasting. I used to be much more stealthy! But that's not much of a complaint and I'm thrilled with how the bike now just smoooothly glides. I had no idea how much resistance had built up in the old wheel and derailleur. I know the derailleur was contributing because now when I backpedal I marvel at the lack of friction.
In the photo below you can see the results of my fender painting. After all these years of full-time commuting my Honjos are not looking as shiny as they did. I'm liking the pinstripe that now picks up my frame color on the fenders.

I still have more upgrades planned. I have a tire and new brake pads waiting for a new front wheel, I'd like it to match the rear. Hmmm. Is that it? Might I be getting close to the end of upgrades for the bike? Is that possible?

I might have saved some money (maybe) if I'd just bought a new bike and was done with it. Especially now that there are some cute, affordable city bikes (though probably made in Taiwan).
I am perhaps more proud of this old bike. I created this. It's my bike, there's not another one like it in the world, and I have learned so much in doing this. My husband has also learned a lot, I have him to thank for taking the wheel-building class. We've both grown in bike knowledge (and if we can, anyone can).
There's a wealth of old 10-speeds out there, and many are great bikes. Please don't send them to the dump! There's an adventure, sometimes frustrating, always informative, to be had in recycling them into lightweight beautiful city bikes.
Wednesday, November 4, 2009
Chainguard for a Dahon Folding Bicycle
My friend B just installed a chainguard on his wife's Dahon folding bike which she uses as her commuter. As folding bikes present their own challenges he was kind enough to document the process for us all.
Bike: Dahon Mariner
Problem: Pants in the chain.
Inspiration: Commuting Cyclist's chainguard

First, I ordered the chrome chain guard from Velo Orange for $10. Next, I picked up the Metal Strapping Kit (under $3 at the local hardware store), though it turns out it wasn't needed. After playing around with the chain guard, I realized I'd have more room by removing the plastic protective front chain ring, so off it went.
The chain guard is about 4" longer than the Dahon chain stay, and without modification the upper edge (parallel to the ground) would push it ~1/2" out, causing the chain guard to interfere with the pedal stroke. So, I clamped the chain guard to the kitchen counter and hacksawed its upper edge so that it could be bent up and around the seat stay later on.

The chain guard comes with two clasps, the larger of which does fit around the seat tube and position the guard in the right position. The clasp rests on the rear derailleur cable hanger and pinches the rear derailleur cable a bit, but the shifting is still smooth. No need for the metal strapping per the other website. Lining up the clasp, screw, washers, chain guard and nut was a pain, but brute force triumphed in the end.

With the front end attached, I needed a way to secure the rear end in a way that wouldn't rattle. I thought about using an inner tube to pad the seat stay but settled on using an old mountain bike grip that had been looking for a purpose for about a decade. Duct tape holds the grip in place (and matches the frame color), and a zip tie snugs the guard against the padded seat stay. Some nudging here and there, and the entire chain guard is out of the way of the pedal and doesn't rub the chain. In retrospect it would have been easier to do most of the bending and sharp edge buffing prior to securing the front, but I got it pretty well folded away and smoothed out in place. I was tempted to take it off, but the screw was enough of a pain that I decided to live with it as is.

My wife took it for it's first ride yesterday, and she did say that she felt her pants start to get chomped in the chain once during the ride, but they didn't get sucked all the way in. We'll see how it fares.
Bike: Dahon Mariner
Problem: Pants in the chain.
Inspiration: Commuting Cyclist's chainguard

First, I ordered the chrome chain guard from Velo Orange for $10. Next, I picked up the Metal Strapping Kit (under $3 at the local hardware store), though it turns out it wasn't needed. After playing around with the chain guard, I realized I'd have more room by removing the plastic protective front chain ring, so off it went.
The chain guard is about 4" longer than the Dahon chain stay, and without modification the upper edge (parallel to the ground) would push it ~1/2" out, causing the chain guard to interfere with the pedal stroke. So, I clamped the chain guard to the kitchen counter and hacksawed its upper edge so that it could be bent up and around the seat stay later on.

The chain guard comes with two clasps, the larger of which does fit around the seat tube and position the guard in the right position. The clasp rests on the rear derailleur cable hanger and pinches the rear derailleur cable a bit, but the shifting is still smooth. No need for the metal strapping per the other website. Lining up the clasp, screw, washers, chain guard and nut was a pain, but brute force triumphed in the end.
With the front end attached, I needed a way to secure the rear end in a way that wouldn't rattle. I thought about using an inner tube to pad the seat stay but settled on using an old mountain bike grip that had been looking for a purpose for about a decade. Duct tape holds the grip in place (and matches the frame color), and a zip tie snugs the guard against the padded seat stay. Some nudging here and there, and the entire chain guard is out of the way of the pedal and doesn't rub the chain. In retrospect it would have been easier to do most of the bending and sharp edge buffing prior to securing the front, but I got it pretty well folded away and smoothed out in place. I was tempted to take it off, but the screw was enough of a pain that I decided to live with it as is.
My wife took it for it's first ride yesterday, and she did say that she felt her pants start to get chomped in the chain once during the ride, but they didn't get sucked all the way in. We'll see how it fares.
Thursday, October 8, 2009
New Bottom Bracket and the Simplex Chainguard
Step one of my drivetrain overhaul is complete. My bike has a new sealed cartridge bottom bracket, which will be much easier to maintain going forward, particularly as we enter winter.
The new bottom bracket required new cranks, something I wasn't thrilled about, but it all works flawlessly now. Perhaps someday I will find prettier cranks with the correct taper.
It's worth noting that, while we could have installed the cartridge ourselves, removing the old cups from the old-fashioned bottom bracket was not something we could do ourselves. Shops have expensive specialized tools to complete the task quickly and efficiently. My second-favorite mechanic on earth (I'm not married to you, J) did all of this for less money than the one-month bus pass I would have had to buy while we fought with the bike. In other words, money well spent.
As part of the repair we brought in the hack-sawed SKS chainguard bracket which he put on when installing the cartridge. It was originally 3-armed and we removed one to leave just two mounting points for the chainguard. This modification allowed me to install my pretty French chainguard!

It would probably look better with a larger chainring but this is the size calculated to be ideal for Step Two of the drivetrain overhaul, internal 3-speed hub. My husband finished the wheel last night, so that's happening soon. You can see that the modern cranks are a little, uh, robust, beefy, for the vintage bike, but they do work well.
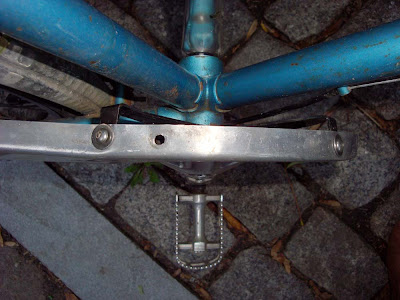
I had to drill a new hole in the chainguard to match the bracket. It was easy to do. The bracket is threaded, so I haven't added the nuts to the screws yet. I will do that this weekend as I now have it positioned just right.
Here you can see how the chopped SKS chainguard mount holds the chainguard without touching my frame. It's clamped on by the bottom bracket. I like that there will be no cause for more rust than I already have...
SKS, I know you're not reading but if you were I think this would be a natural product to offer. So many people struggle with mounting a custom chainguard, why don't you offer a vintage chainguard kit?
I've been riding with it for a week now and it's been great. I feel like my bike has new jewelry, and my trousers have been protected. The new bottom bracket is a more subtle upgrade, but it does make the bike feel stronger, smoother, and thus safer. I'm a very happy cyclist.
The new bottom bracket required new cranks, something I wasn't thrilled about, but it all works flawlessly now. Perhaps someday I will find prettier cranks with the correct taper.
It's worth noting that, while we could have installed the cartridge ourselves, removing the old cups from the old-fashioned bottom bracket was not something we could do ourselves. Shops have expensive specialized tools to complete the task quickly and efficiently. My second-favorite mechanic on earth (I'm not married to you, J) did all of this for less money than the one-month bus pass I would have had to buy while we fought with the bike. In other words, money well spent.
As part of the repair we brought in the hack-sawed SKS chainguard bracket which he put on when installing the cartridge. It was originally 3-armed and we removed one to leave just two mounting points for the chainguard. This modification allowed me to install my pretty French chainguard!
It would probably look better with a larger chainring but this is the size calculated to be ideal for Step Two of the drivetrain overhaul, internal 3-speed hub. My husband finished the wheel last night, so that's happening soon. You can see that the modern cranks are a little, uh, robust, beefy, for the vintage bike, but they do work well.
I had to drill a new hole in the chainguard to match the bracket. It was easy to do. The bracket is threaded, so I haven't added the nuts to the screws yet. I will do that this weekend as I now have it positioned just right.
SKS, I know you're not reading but if you were I think this would be a natural product to offer. So many people struggle with mounting a custom chainguard, why don't you offer a vintage chainguard kit?
I've been riding with it for a week now and it's been great. I feel like my bike has new jewelry, and my trousers have been protected. The new bottom bracket is a more subtle upgrade, but it does make the bike feel stronger, smoother, and thus safer. I'm a very happy cyclist.
Wednesday, October 7, 2009
Cloud Bike
On a grey rainy day I thought of this "Cloud Bike" I spotted on Newbury Street last week. I thought the color scheme was distinctive, when I got closer I noticed many personalized details.

What do you all think of this custom headbadge? I'm intrigued with custom headbadges at the moment.

I was also interested in the chainguard, as I was working out how to mount mine. My setup looks nothing like this one, both are good.

A simple clamp works if you have the arm that comes off the chainguard. I wonder if that could be fabricated? Their chainring is a better size, aesthetically, than mine, it tucks in nicely to the guard while mine is a little small. I like the look of this one.

This clamp is obviously made for the job, and does it well.
What do you all think of this custom headbadge? I'm intrigued with custom headbadges at the moment.
I was also interested in the chainguard, as I was working out how to mount mine. My setup looks nothing like this one, both are good.
A simple clamp works if you have the arm that comes off the chainguard. I wonder if that could be fabricated? Their chainring is a better size, aesthetically, than mine, it tucks in nicely to the guard while mine is a little small. I like the look of this one.
This clamp is obviously made for the job, and does it well.
Friday, September 25, 2009
Installing Chainguards and Chaincases

You know, those things on European bikes that make them easier to ride in your work clothes... I got the three pictured above on eBay France, and my friend held them until our visit (merci encore Julien!).
We don't have many chainguards here in the States, and getting them installed takes more than a little Yankee ingenuity.
If you're lucky your bike will have tabs for a chainguard and installation is easy.
Often they're attached with clamps (the Mistral clamps are particularly pretty) which seem the easiest approach, particularly if your bike had a clamp-on derailleur which left a ring of rust (like mine). A friend of mine has mounted the Velo Orange chaincase with clamps and blogged about the process. His required even more Yankee ingenuity because he rides a cargo bike.
I'm getting ready to work on mine this weekend. We'll see if my plan to cannibalize an old SKS chainguard for its guts, and attach it to the winged Simplex chainguard pictured above, will work... I hope to develop a protocol because "La Perle" will be going on Mom's bike (her name means "Pearl"), and the last one pictured will be on Dad's bike. By the time I'm done I'll be an expert at this! (Or I'll give up in frustration).
Additional suggestions gratefully welcomed!
Tuesday, September 1, 2009
Monday, August 17, 2009
Handsome Parisian Men on Bicycles
Friday, August 7, 2009
Back from France
Thursday, July 16, 2009
Wednesday, May 27, 2009
Elegant Simplicity
Subscribe to:
Posts (Atom)


