Showing posts with label DIY. Show all posts
Thursday, May 19, 2011
The Burlington Bike
How awesome is this bike? The owner must have found a stretchy cling map somewhere, I can't figure out how it came to be so perfectly and seamlessly attached to the bike.
Certainly there is some careful application involved.
The lugs are perfect for this sort of treatment.
This was the coolest bicycle we saw in Burlington, outside of the Old Spokes Home. When I was visiting their WONDERFUL museum upstairs in their shop I got a phone call that someone very dear to me had died, so I didn't get you any photos. You'll just have to go up and visit yourselves and I promise it's worth stopping in.
Thursday, August 19, 2010
Practical Joke?
Tuesday, August 10, 2010
Fender Detail
Tuesday, June 8, 2010
Thursday, January 14, 2010
Start of my Ladies Coat Project

I've been envious enough of my husband's cycling jacket to be on the hunt for one of my own. I finally found what I was looking for in the after Christmas sales. Oh the irony that the perfect cycling coat is currently being called a "car coat"!
The coat is:

- wool (blend)
- light camel colored to contrast with asphalt
- Thinsulate lined
- possessing seam details I can highlight in 3M reflective tape
- shorter in length, as my current coat occludes my seatpost tail light
- otherwise unremarkable, and thus unlikely to draw attention to itself
- inexpensive (yes, that factory outlet clearance sticker says $36.98)
In social lighting the coat does not read as anything remarkable:

Here the coat is flashed, you can see the one band of reflective tape and see all those seams where I can add more!
I look forward to getting everywhere bike and still quickly looking almost "normal" (whatever that really is).
Friday, December 18, 2009
He Likes It!
Dad's bike is a complete success, but I might actually be even happier than he is.
He's out riding it today, in this frigid weather, so I know he really likes it.
The rest of the story:
Part One
Part Two
Part Three
Part Four
Part Five
Tuesday, December 15, 2009
Rode a pretty black bike to work today
Zeus is mostly done! All the rest of the work will be customizing it for Dad.
This bike is SO MUCH FUN to ride. It's a little tall for me, so I feel like I see forever. I haven't loaded it down with racks and bags so it's light and quick and it really does Zoooom!
I took these photos at a playground because Dad is telling everyone about how he's getting a bicycle for Christmas. He sounds so happy when he says it, and he also sounds like he's about 6 years old. It's adorable. Aren't bikes great?
The bike shifts well. The stem shifters work great (10 on the tree, instead of 3!) and I think we have the derailleurs adjusted so he can't throw the chain.
I'm not sure the gearing will be perfect for Dad, but that's the work of time. I'm happy we'll get to ride around together while he's here and work out these details. I look forward to sharing what I know about bikes, just as he once did about vintage cars. And just as I learned all the tricks I needed to get the old machines he gave me running, he's going to have to learn the delicacy of shifting this old friction system. The thing is, unlike the pink and grey wedding cake Edsel he wanted to give me when I turned 16, these old vintage machines are a bit cheaper to keep running! But I do think he will have an appreciation for it.
As suggested, I may switch the water bottle to his non-dominant hand. I know he's going to love the cork grips, they feel really nice. The cheap Wald handlebars are wide for my slender lady shoulders but I highly recommend them for men.
See Next Installment
Monday, December 14, 2009
Pretty Panniers
I can't imagine where s/he found such perfect bags - they look purpose built with that flat side for hanging against the bike, and look like they match all the Gilles Berthoud bags. Yet the attachment system is certainly not ideal. I wouldn't want to ever need to unloop all those straps threaded through the rack. I suppose it wouldn't be hard to rig a set of hooks instead, if one could find bags like these.
Does anyone know these panniers?
Thursday, December 10, 2009
And still more
I feel badly, I just plain haven't had time to bring you more images of chic cyclists. Between the darkness, work, and my time working on this bike, this bike is all the news I have.
OH! But, if any of you are riding over the Mass Ave bridge towards MIT this morning, keep your eyes open on the MIT side. The entire bike lane has been strewn with Scrabble tiles. I saw the letters to make "wars" or "raw". Let me know if you see any words on your trip.
OK, on to interim project photos.

Here's the bike as of this morning.
I had the headset put on, but everything else I've done myself. I'm extra proud of this bike and look forward to finishing it.

Here's a view of what Dad will see. We'll probably add a light and I'm debating on one of those pretty Crane bells. I have black cork grips I will put on at the very end, when everything is adjusted.

Every time I really look at these bands of white on the seat tube I think I should change the gumwalls I already had to whitewall tires. Maybe next Christmas? These gumwalls have only about 20 miles on them.
That's a Wright leather saddle we had kicking around. In 1962 Wright and Brooks merged into something called the Raleigh Saddle Division (according to this PDF from Brooks).

The Zeus clamp-on double cable guide I got last night. It is SO CLOSE to closing! I just tried it on the bike before work, so we'll go back tonight with pliers and try to get the existing screw to close it. If not I think we can get another just a mm or two longer which will do the trick.
This guide is a knock-off of the Campagnolo ones, and I held it up to one on my International. It's not as nicely made but all the angles are the same so I think it will function just fine.
My dad is a life-long fan of Greek history (his name is Alexander) so we've now dubbed this bike "Zeus", but you have to say it like "Zooom!" since the bike will be so quick. So the bike's name is really "Zooos!"

The ladies at Bikes Not Bombs helped me dig through the used stem shifters to find a set which could take Dad's downtube shift levers. I kept the Arabesque-engraved downtube clamp in case he decides to make this a more aggressive bike as he progresses as a cyclist.
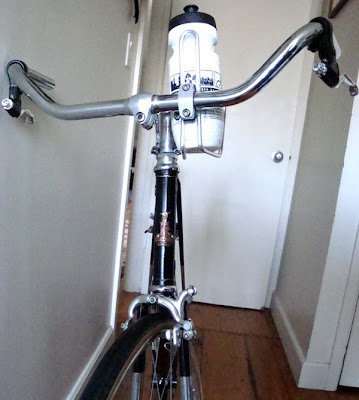
I like the sweep of these handlebars for Dad. I don't know which side the waterbottle is supposed to go on, since Dad is a lefty I put it on the left.
See Next Installment
OH! But, if any of you are riding over the Mass Ave bridge towards MIT this morning, keep your eyes open on the MIT side. The entire bike lane has been strewn with Scrabble tiles. I saw the letters to make "wars" or "raw". Let me know if you see any words on your trip.
OK, on to interim project photos.
Here's the bike as of this morning.
I had the headset put on, but everything else I've done myself. I'm extra proud of this bike and look forward to finishing it.
Here's a view of what Dad will see. We'll probably add a light and I'm debating on one of those pretty Crane bells. I have black cork grips I will put on at the very end, when everything is adjusted.
Every time I really look at these bands of white on the seat tube I think I should change the gumwalls I already had to whitewall tires. Maybe next Christmas? These gumwalls have only about 20 miles on them.
That's a Wright leather saddle we had kicking around. In 1962 Wright and Brooks merged into something called the Raleigh Saddle Division (according to this PDF from Brooks).
The Zeus clamp-on double cable guide I got last night. It is SO CLOSE to closing! I just tried it on the bike before work, so we'll go back tonight with pliers and try to get the existing screw to close it. If not I think we can get another just a mm or two longer which will do the trick.
This guide is a knock-off of the Campagnolo ones, and I held it up to one on my International. It's not as nicely made but all the angles are the same so I think it will function just fine.
My dad is a life-long fan of Greek history (his name is Alexander) so we've now dubbed this bike "Zeus", but you have to say it like "Zooom!" since the bike will be so quick. So the bike's name is really "Zooos!"
The ladies at Bikes Not Bombs helped me dig through the used stem shifters to find a set which could take Dad's downtube shift levers. I kept the Arabesque-engraved downtube clamp in case he decides to make this a more aggressive bike as he progresses as a cyclist.
I like the sweep of these handlebars for Dad. I don't know which side the waterbottle is supposed to go on, since Dad is a lefty I put it on the left.
See Next Installment
Tuesday, December 8, 2009
Update on Dad's Bike
Well, as expected I'm learning so much with this project! This weekend's life lesson was to widen one's gaze. Certainly vintage Campagnolo is stunning, and would be correct for dad's bike, but I discovered a treasure trove of bike jewelry that mere mortals might actually afford: Shimano 600 Arabesque.
Man, is this stuff beautiful! It is the vintage analog to modern Ultegra, and was made from 1978 to 1984. I love the engraving, and the black enamel accents are the perfect counterpoint to the rich black paint on dad's bike.
I have included extra-large photos if you want to click to make them huge.
The front derailleur is relatively restrained, when you see the rest of the component group.
Absolutely stunning downtube shifters - but Dad doesn't want downtube shifters! More on that later...
The cranks are in perfect condition, they hardly look used.
I went with a short cage derailleur because we'll just have a double crankset in front. I hope it will have enough pull.
Note the engraving and fluting on the front face as well as the derailleur cage.
See Next Installment
Monday, November 23, 2009
Getting There!

What a treat to look back at my post from March 4, 2008. As of this weekend I have accomplished all the goals listed there and more.
On the list for upgrading I had:- a front rack
- a wine box from a good vineyard for carrying groceries (we'll have to buy the wine too, this is an expensive upgrade)
- better tires
- chainguard
- maybe go singlespeed
Well, as to this last goal, I decided that an internal hub might be better for my needs while still accomplishing the winter protection I was looking for. My husband built the wheel and we got it installed yesterday. The only challenge was that my handlebars are not round, and not standard, so getting the shifter on was a big deal. Everything else went smoothly. I chose a new Sturmey-Archer three speed mostly because it was already sized for my very narrow dropouts and I didn't want to have to spread the rear triangle. We laced it to a Salsa Delgado rim. My only complaint thus far is that I didn't realize the hub would click whether I was pedaling or coasting. I used to be much more stealthy! But that's not much of a complaint and I'm thrilled with how the bike now just smoooothly glides. I had no idea how much resistance had built up in the old wheel and derailleur. I know the derailleur was contributing because now when I backpedal I marvel at the lack of friction.
In the photo below you can see the results of my fender painting. After all these years of full-time commuting my Honjos are not looking as shiny as they did. I'm liking the pinstripe that now picks up my frame color on the fenders.

I still have more upgrades planned. I have a tire and new brake pads waiting for a new front wheel, I'd like it to match the rear. Hmmm. Is that it? Might I be getting close to the end of upgrades for the bike? Is that possible?

I might have saved some money (maybe) if I'd just bought a new bike and was done with it. Especially now that there are some cute, affordable city bikes (though probably made in Taiwan).
I am perhaps more proud of this old bike. I created this. It's my bike, there's not another one like it in the world, and I have learned so much in doing this. My husband has also learned a lot, I have him to thank for taking the wheel-building class. We've both grown in bike knowledge (and if we can, anyone can).
There's a wealth of old 10-speeds out there, and many are great bikes. Please don't send them to the dump! There's an adventure, sometimes frustrating, always informative, to be had in recycling them into lightweight beautiful city bikes.
Wednesday, November 4, 2009
Chainguard for a Dahon Folding Bicycle
My friend B just installed a chainguard on his wife's Dahon folding bike which she uses as her commuter. As folding bikes present their own challenges he was kind enough to document the process for us all.
Bike: Dahon Mariner
Problem: Pants in the chain.
Inspiration: Commuting Cyclist's chainguard

First, I ordered the chrome chain guard from Velo Orange for $10. Next, I picked up the Metal Strapping Kit (under $3 at the local hardware store), though it turns out it wasn't needed. After playing around with the chain guard, I realized I'd have more room by removing the plastic protective front chain ring, so off it went.
The chain guard is about 4" longer than the Dahon chain stay, and without modification the upper edge (parallel to the ground) would push it ~1/2" out, causing the chain guard to interfere with the pedal stroke. So, I clamped the chain guard to the kitchen counter and hacksawed its upper edge so that it could be bent up and around the seat stay later on.

The chain guard comes with two clasps, the larger of which does fit around the seat tube and position the guard in the right position. The clasp rests on the rear derailleur cable hanger and pinches the rear derailleur cable a bit, but the shifting is still smooth. No need for the metal strapping per the other website. Lining up the clasp, screw, washers, chain guard and nut was a pain, but brute force triumphed in the end.

With the front end attached, I needed a way to secure the rear end in a way that wouldn't rattle. I thought about using an inner tube to pad the seat stay but settled on using an old mountain bike grip that had been looking for a purpose for about a decade. Duct tape holds the grip in place (and matches the frame color), and a zip tie snugs the guard against the padded seat stay. Some nudging here and there, and the entire chain guard is out of the way of the pedal and doesn't rub the chain. In retrospect it would have been easier to do most of the bending and sharp edge buffing prior to securing the front, but I got it pretty well folded away and smoothed out in place. I was tempted to take it off, but the screw was enough of a pain that I decided to live with it as is.

My wife took it for it's first ride yesterday, and she did say that she felt her pants start to get chomped in the chain once during the ride, but they didn't get sucked all the way in. We'll see how it fares.
Bike: Dahon Mariner
Problem: Pants in the chain.
Inspiration: Commuting Cyclist's chainguard

First, I ordered the chrome chain guard from Velo Orange for $10. Next, I picked up the Metal Strapping Kit (under $3 at the local hardware store), though it turns out it wasn't needed. After playing around with the chain guard, I realized I'd have more room by removing the plastic protective front chain ring, so off it went.
The chain guard is about 4" longer than the Dahon chain stay, and without modification the upper edge (parallel to the ground) would push it ~1/2" out, causing the chain guard to interfere with the pedal stroke. So, I clamped the chain guard to the kitchen counter and hacksawed its upper edge so that it could be bent up and around the seat stay later on.

The chain guard comes with two clasps, the larger of which does fit around the seat tube and position the guard in the right position. The clasp rests on the rear derailleur cable hanger and pinches the rear derailleur cable a bit, but the shifting is still smooth. No need for the metal strapping per the other website. Lining up the clasp, screw, washers, chain guard and nut was a pain, but brute force triumphed in the end.
With the front end attached, I needed a way to secure the rear end in a way that wouldn't rattle. I thought about using an inner tube to pad the seat stay but settled on using an old mountain bike grip that had been looking for a purpose for about a decade. Duct tape holds the grip in place (and matches the frame color), and a zip tie snugs the guard against the padded seat stay. Some nudging here and there, and the entire chain guard is out of the way of the pedal and doesn't rub the chain. In retrospect it would have been easier to do most of the bending and sharp edge buffing prior to securing the front, but I got it pretty well folded away and smoothed out in place. I was tempted to take it off, but the screw was enough of a pain that I decided to live with it as is.
My wife took it for it's first ride yesterday, and she did say that she felt her pants start to get chomped in the chain once during the ride, but they didn't get sucked all the way in. We'll see how it fares.
Thursday, October 22, 2009
My Trinket
Inspired by Dottie's post, and in agreement with her Emily citation:
I have switched out my pink flower, and am now wearing a spray of mums and leaves.
The morns are meeker than they were,
The nuts are getting brown;
The berry’s cheek is plumper,
The rose is out of town.
The maple wears a gayer scarf,
The field a scarlet gown.
Lest I should be old-fashioned,
I’ll put a trinket on.
-Emily Dickinson
I have switched out my pink flower, and am now wearing a spray of mums and leaves.
Tuesday, October 20, 2009
Trondheim Skirt Guard
This lovely submission comes from my world-traveling friend E, who noted the charm of what appears to be a home-made skirt guard on this folding bike in Trondheim.
Ever since I examined the skirt guard of that Pinarello in Washington I've been taken with the idea of giving it a try. Could be fun!
Friday, October 16, 2009
Reflective Cycling Cape Update
Well, I've finished my reflective cycling cape and I must say I'm just a tiny bit disappointed. The price and time commitment were definitely right, but the finished result isn't as great as I'd hoped. Oh, it's cute all right. I like it, and I think for someone else it will be perfect, but
- it's too grey for my complexion, I look washed out when I wear it
- it's too short for me - the next one will be a different, longer pattern
- it's too light weight for me - this I had suspected but I liked the fabric's slubby weave... This cape belongs in Florida or some place warmer than here
- the contrast of the seam binding (which matches the gold fibers) is more striking than the reflection of the fibers themselves - the cape is probably safest worn inside out and while the construction would be proud to be on display (did anyone see the Hermes dresses last spring? Inside out to show the impeccable construction), that wasn't my intent...
On final review it's worth far more than the $5 I spent, but it not yet the ideal reflective cycling cape.
Friday, September 25, 2009
Installing Chainguards and Chaincases

You know, those things on European bikes that make them easier to ride in your work clothes... I got the three pictured above on eBay France, and my friend held them until our visit (merci encore Julien!).
We don't have many chainguards here in the States, and getting them installed takes more than a little Yankee ingenuity.
If you're lucky your bike will have tabs for a chainguard and installation is easy.
Often they're attached with clamps (the Mistral clamps are particularly pretty) which seem the easiest approach, particularly if your bike had a clamp-on derailleur which left a ring of rust (like mine). A friend of mine has mounted the Velo Orange chaincase with clamps and blogged about the process. His required even more Yankee ingenuity because he rides a cargo bike.
I'm getting ready to work on mine this weekend. We'll see if my plan to cannibalize an old SKS chainguard for its guts, and attach it to the winged Simplex chainguard pictured above, will work... I hope to develop a protocol because "La Perle" will be going on Mom's bike (her name means "Pearl"), and the last one pictured will be on Dad's bike. By the time I'm done I'll be an expert at this! (Or I'll give up in frustration).
Additional suggestions gratefully welcomed!
Subscribe to:
Posts (Atom)


